Mosaic Needlepoint

La Guardia Airport Mosics

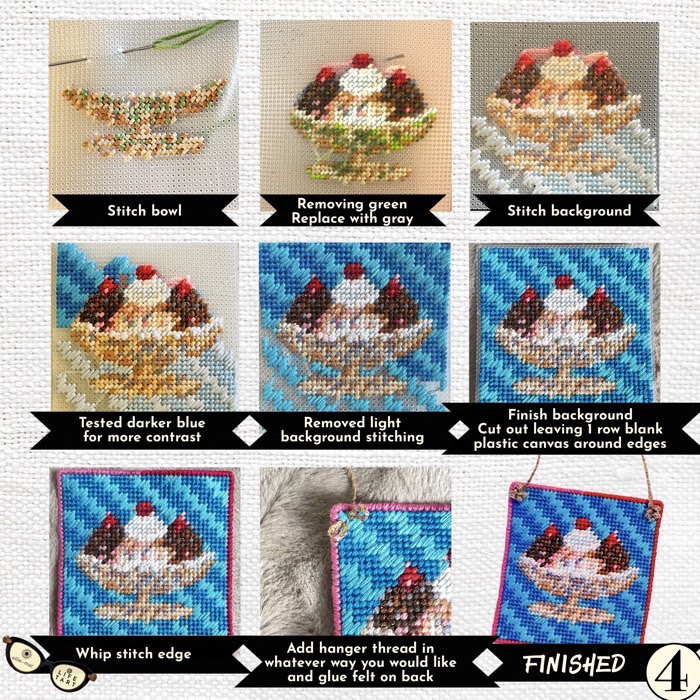
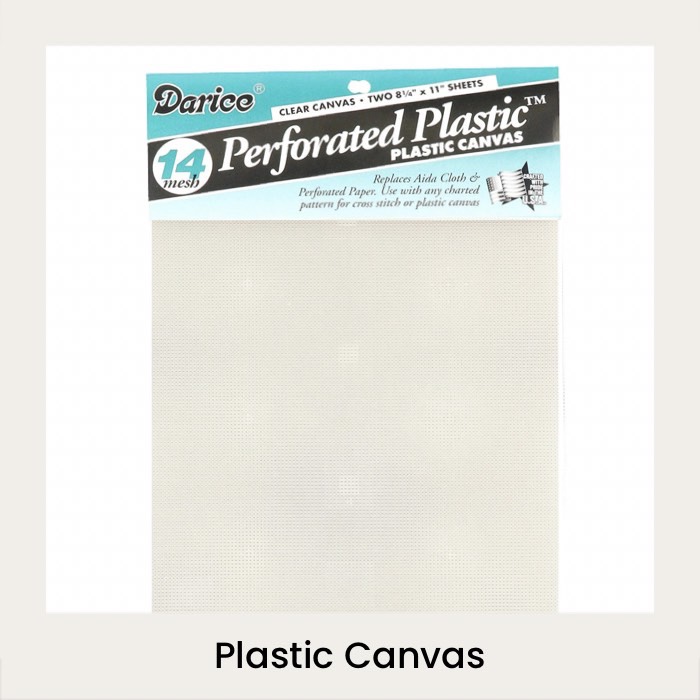
Anytime you see a mosaic made from square tiles laid out in a grid, you are looking at a charted Needlepoint design just waiting to happen – follow the steps below to stitch mosaics into needlepoint on any iPhone/iPad. This little ornament was made with embroidery floss, wool and 14# plastic canvas. A link to buy the plastic canvas is at the end.

How MOSAIC NEEDLEPOINT came about…..

My child recently spent a gap year in NYC….as a result I spent a lot of time in NYC “Checking In”….and a lot of time in LaGuardia airport.

LaGuardia airport has enchanting mosaics ALL over the airport…when I see mosaics, I see charted needlepoint designs…so I took lots of pictures.

When the time came to move said child out of their NYC digs, it was a bit of a “project” shall we say…the apartment was a sea of clothing, various collected “treasures”, Cheetos, luggage, boxes and needlepoint supplies scattered ALL over the apartment – I found thread in kitchen drawers…why one would keep embroidery floss with spoons and forks is not for me to know…I posted a 5 part Instagram series called “NEEDLEPOINT STONE SOUP – A Cautionary Travel Tale” detailing this expedition here

As we cleaned and packed, I scavenged thread, needles and canvas from all over the apartment and amassed quite a cache of supplies. Upon returning to my hotel room, I realized I could use some of the thread to rework part of a canvas I had brought on my trip.

What to do with the rest? Since I had gone as far as possible on my reworked canvas, I decided to give the LaGuardia Airport Mosaic photos a go…just to see what would happen…this sweet little ice cream sundae Needlepoint ornament is what “happened”.

Mosaics can be stumbled upon while out and about, but they can also be found online by searching phrases like “square tile mosaics” “square mosaic patterns”, etc. Pinterest is a wealth of inspiration as are tile manufacturers websites.

Google “Square Mosaic Tile”
The canvas I buy and where to get it!

Note to readers: if you purchase something through one of my affiliate links I may earn a commission. Please read my disclosure for more info.

Scrapbooking with Iphone photo apps – made EASY (Part 2)

PART 2 -Apps I love & how I use them. Grids, Fun labels & Filters (tutorial)

My daughter loves our scrapbooks – it is like an illustrated fairytale of her (our) life – how could you not love that!?

I love the IDEA of scrapbooks and I love scrapbooks themselves.

I love all of the little stickers, stamps, tapes and decorations for scrapbooks.

I love having a hard copy of the most important photos on my computer.

What I do NOT love is the stress of scrapbooking.

When I bought an iPhone, I discovered some fantastic, easy apps & the stress disappeared when I developed a “SYSTEM” that is fast – and fun!

I still get to use all those wonderful little decorations and we actually have a scrapbook to sit down and look through – which is better than a box of mixed up photos any day!

Scrapbooking with Iphone apps – made EASY, divided into three posts (I post on Wednesdays at 11:30 MT).

1. Scrapbooking with an iPhone – my SYSTEM & apps

2. Apps I love & how I use them. Grids, Fun labels & Filters (tutorial).

3. Tying up the loose ends from parts 1 & 2, extra apps – everything comes together!

SO HERE WE GO! PART 2!

Apps I love & how I use them. Grids, Fun labels & Filters

VISUAL TUTORIALS OF MY FAVORITE APPS!

1.PicFrame ($0.99)

This app allows you to combine up to 5 photos into a grid and add labels.

Click to enlarge

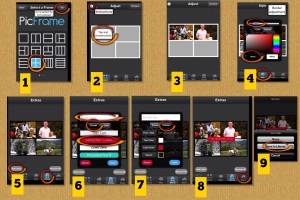
If you will be using your photo grid for a 5×7 postcard with the app PhotoCard, be sure to click the 3:2 measurement in the upper right corner (See #1).

2. Montage Magic ($.99)

This app allows you to combine tons of photos, label them and has great backgrounds – wonderful when you want to use more than 5 photos!

I previously posted a tutorial of this app and you can find it here!

3. Bill Atkinson’s PhotoCard – Postcards ($0.99)

This is my MUST HAVE app. It is the backbone of my scrapbook – I use grids, filters & labels on my photos and always import them into PhotoCard to send a finished 5×7 laminated photo postcard to myself for my scrapbook.

Click to enlarge

FILTERS & LABEL APPS

No tutorials on these apps – the filters are either super easy or difficult enough that I just mess with them until I get something I like and then save it; the labels are the same!

LABEL APPS

MaskingTape

(great for adding a cute label to one photo)

Photo Notes

(great for speech bubble photos and text)

Ransom Letters

Love this app! Let’s you add text like a ransom note with cutout letters!

FILTER APPS

Pixlr-o-matic

Easy

FilterMania 2

Easy – SUPER FUN

– only works for square photos – it will force you to make your photo a 1:1.

Snapseed

This is my “go to” for editing

Easy photo editing; great filters

Iris Photo Suite

Easy

ScratchCam

Hard – unless you just play around with it until you find something you like.

PicGrunger

Play around with it.

***********

NEXT POST:

Pictures of my scrapbook pages

Comparison of other photo postcard apps – Pros & Cons

Scrapbooking apps

Tying up loose ends!

Next Post: WEDNESDAY, JULY 25th @ 11:30 a.m.

Be well! Have a safe weekend and July 4th!

By Eleanore Macnish

Scrapbooking with Iphone photo apps – made EASY (Part 1)

I have a cousin named Maureen who is an amazing scrapbooker. Her scrapbooks are like works of art – the layout, her color choices, use of space, font selection, etc. – she is a true “scrapbooker”. 

I on the other hand, am someone who loves scrapbooks – but try as I might, I just cannot make all the elements come together.  I can order the prints. I LOVE to go to craft stores and buy all sorts of beautiful paper, stickers, tapes, pins, jeweled brads & tools. I love all the organizational bins & folders.

But when it comes time to sit down and organize all those photos, date them, narrate them and use all those wonderful stickers and ribbon, it is soooooo frustrating that I end of getting very little done, and just throw everything back in the box.

When I bought an iPhone and discovered some fantastic and easy apps, everything changed and I developed a “SYSTEM” that is easy & fast and when I am ready to make the pages, everything is dated and narrated AND the photos are already laid out!!

While my scrapbooks are not works of art like Maureen’s, I still get to use all those wonderful little decorations and we actually have a scrapbook to sit down and look through – which is better than a box of mixed up photos any day!  The narrations are way better than anything I could try to pull from memory – because I write them within hours of taking the photo!….usually!

Scrapbooking with Iphone apps – made EASY, divided into three posts (I post on Wednesdays at 11:30 MT).

1. Scrapbooking with an iPhone – my SYSTEM & apps

2. Apps I love & how I use them. Grids, Fun labels & Filters (tutorial).

3. Tying up the loose ends from parts 1 & 2, extra apps – everything comes together!

1. SCRAPBOOKING WITH AN IPHONE

APPS: Get these apps and start playing around with them.

  • Bill Atkinson’s Photo Card  Free    (Buy PayPal credits – costs about $2 to print & mail a      5 x 7 double side laminated postcard.)
  • PicFrame  $.99    (Great for combining up to 5 photos into a picture grid and includes great labels “stickers” for labeling photo. You can save your picture in high res.)
  • Montage Magic  $.99     (How this app is only $ .99 I will never know. It is the only app I have ever run across that might actually be worth $10 – yes, it is that good!  Lots of backgrounds, lets you drag photos & words around the screen and pinch or zoom to change the size.  Also, allows you to download free fonts within the app from font sites on the internet. You can save your picture in high res. so everything is crystal clear).

They are so easy, you probably won’t even need next week’s tutorial post, but I will show you some settings that are good to know about, etc.

MY SCRAPBOOK “SYSTEM” – I swear to you, this is easy and it works.

  • Take a picture or a bunch
  • Use PicFrame or Montage Magic to label one photo or make up to five photos into a grid/collage and label.  Save to “Camera Roll” in High Resolution.
  • Use Bill Atkinson’s Photo Card to make your previously saved pic or grid/collage into a postcard.

  • On the back, write a letter to yourself about the picture(s) and mail it to yourself.
  • When your postcard arrives in the mail, throw it in your “scrap box**” (mine is in the kitchen) until you are ready to deal with it.
  • When you are ready to use the postcard for a scrapbooking page, make a copy of the back and cut out the narration you wrote to yourself.  Choose your paper, tape on the postcard and copied narration, decorate and slide it into the plastic sleeve of your scrapbook!
  • DONE!

**The black and white box in the title photo holds ALL of my supplies – Paper, stickers, adhesive ribbon, brads, double stick tape, scissors, labels and lots of Washi Tape!!  The scrap box’s “home” is on the floor, tucked into the corner under the breakfast bar in the kitchen – it’s pretty and no one notices it anyway (-or you could always keep it in a cabinet). The fact that this box lives in my kitchen is one of the “keys” to my successfully keeping up with a scrapbook because the kitchen is where I go through the mail.

I use a 8.5 x 11 scrapbook because the size for page layout is easier for me. I buy them at Hobby Lobby (in our city, Michael’s does not carry this size of scrapbook or paper).

P.S. Yes, this is the second time I have mentioned PhotoCard. No, I have not been paid to promote it – it is quite simply my “go to” photo card app and it is better than the others I have tried…..by leaps and bounds!

By Eleanore Macnish

Word to the wise….Wordle is addictive!

I’m taking a “posting break”!  Every Wednesday for the next few weeks, I am posting past posts from my blog when I was at Blogspot!  This one is from 2009!  Enjoy!

Here is a site you will get absolutely addicted to……..WORDLE– it is so so so much fun! I played around with it for a while and thought “hey! What a cool invitation you could make with this!” All you do is enter a bunch of words and then the computer jumbles them up and makes very cool designs with the words! If you don’t like it, you just hit the button to get a new design!

If you want to make some words larger, just repeat them – “make a button button button earring” would result in a jumble of “make a button earring” with the word “button” being large.

And, if you want to keep the program from separating some words (like I did in the mock invitation) put a tilde between the words. “Eleanore~and~Tom” kept our names together!

P.S. Although there are some great color combinations from which to choose, you can also take a screen picture on your computer (you have to give credit to Wordle somewhere on your finished piece) and import it into something like Photoshop or PicMonkey and then play around with the colors.

My favorite iPhone Photo Collage App…in the whole wide world

iPhone App Montage Magic – in a word….MAGICAL!  A tutorial…..

  • Can you save in Hi-Res? YES!
  • Can you import fonts from the internet? UNBELIEVABLY, YES!!!
  • Can you move stuff around and rotate and scale photos and text by dragging and tilting your finger position? YES!
  • Is there an in-app tutorial? YES!
  • Is it really, really easy to use? YES!
  • Will you show me how to use it? YES YES YES!….if you click on the pictures below to enlarge them!

At this point, just “Go for it!” and play around with it!

I found out about this app through a fantastic blog called iOs Photo Apps and they even have a video tutorial!!  Yay!

By Eleanore Macnish

How to waterproof your Laptop ….ALMOST!

Your laptop and liquids of any kind are NOT friends….no matter how much you want them to be friends, they will never, ever be friends!

Red wine can actually be good for your heart, but is ALWAYS bad for your Laptop!….as is white wine, Diet Coke, water, coffee, hot chocolate, etc.

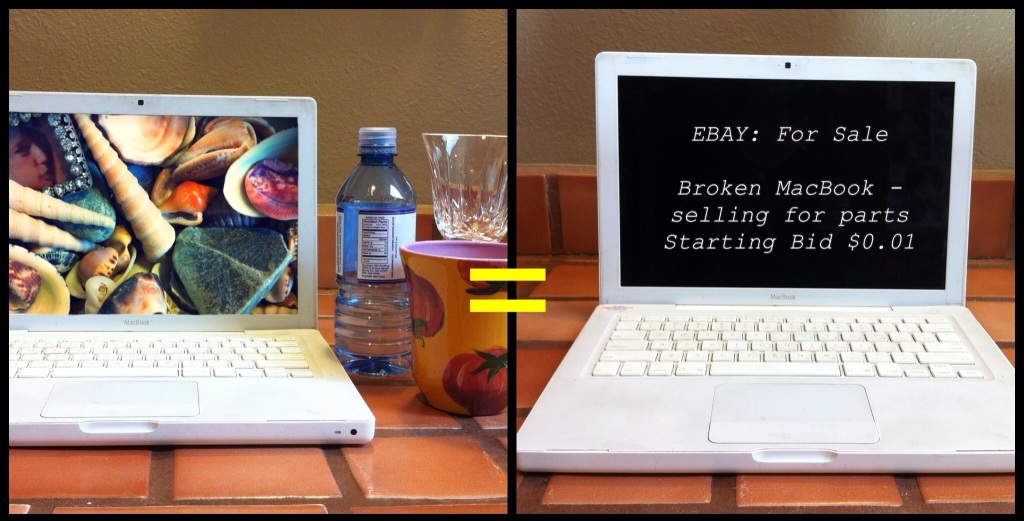
The picture of the laptop in the above photo was my beloved laptop BEFORE & AFTER I spilled wine on it…..It’s “all fun and games” until someone spills a glass of wine on the keyboard!!!

Actually, there were no “fun & games” to speak of — it was just me, sitting in my studio, answering email and reaching for a glass of wine “without really looking”…..and it cost me dearly!

A couple of days after I ruined my “beloved” laptop, I went out and purchased a new laptop (on which I am writing this blog post).  When I purchased my new laptop, I also purchased a silicone “skin” for the keyboard.

I felt mildly protected, but the the edges of the skin kind of “flare up” (exposing the keyboard – scary! I think it is actually meant as a protection from dust), it was “clunky” when I had to write more than a few words (I found myself removing it any time I needed to “really write”), and there was no protection for the speaker holes. All in all, not the greatest solution.

“From now on, must I drink EVERYTHING FROM A SIPPY CUP!?” I lamented………but then I came up with an “idea”….a most wonderful, ingenious, and perfect idea!

“What if I wrapped my keyboard in that “Glad” Press n’ Seal” stuff that sticks to everything, including itself?!”

Yay!! – it works! The track pad responds beautifully, the keys are the same as if they had no covering at all;  I can wrap the whole keyboard and cut out areas for the side panels (USB port, cd slot, etc) but still allow for the wrap to make contact and seal the top of my laptop!  “But what about the speakers?” you ask? ….I don’t know how it works, but the speakers (even though covered) work almost as well – quite honestly, with no discernible difference to my “rookie” ears!

Although the photo above does not show it, I snapped on my plastic laptop cover (Amazon $20) and it anchors the plastic wrap really well! If you do not have a snap-on cover, just tape the wrap to the underside of your computer in a few spots.

When you want to change out your “Glad Press ‘n Seal Keyboard Protection Layer”,  just turn off your computer and wipe off your keys with a kitchen towel moistened with a bit of alcohol and water to get rid of the little residual dots! Do NOT use Windex or anything like it….those products degrade (break down) plastic…..because they are designed for glass.

Disclaimer: This method does not completely waterproof your computer and I am not liable for any damages to your computer.  This is just something I have found works for me and I wanted to share it.

By Eleanore Macnish

Iphone Data Roaming Settings For International Travel – or how to avoid racking up an $8 billion dollar roaming charge!

It’s Wednesday!  Time for a post!

Oh cellular service providers!  How can it be legal? But alas, yes, it is legal and most probably will be until a Senator gets hit with a $4,000 roaming charge upon returning home from an International trip…..but I can’t see that happening anytime soon because the bill would most certainly be reduced once the service provider found out the bill in question belonged to a Senator…….so here are a few pointers with pictures, links to information, and even a forum of poor souls who forgot to change their roaming settings, lamenting their bills (not only AT&T, but many carriers all over the world).  If traveling Internationally, please do research and reading on your own to make sure things have not changed since this post!  Also, if you find inaccuracies, please let me know!  Thanks!

Here we go!  (Clicking on images will enlarge them)

First, click on your “Settings” button

Turn off Cellular Data & Data Roaming

Turn off “Push” and choose Manually for “Fetch”

I was wondering about a few things as I cruised along doing research on this topic.

1. What was my normal data usage at home?  I reset my statistics (“Usage” above “Network” on the “General” screen) and left everything set to my normal settings – my phone’s Data Roaming looking for emails, Facebook updates, etc every 15 minutes.  I took a couple of photos and texted them to myself. Then I kind of forgot about it.  About an hour later (actually an hour and six minutes later), sitting in traffic….I looked at my usage screen, the total was 167 KB – but the International Data Package offered by AT&T lists MB as their data measurement…hmmmm.  I Googled the conversion and it turns out that 167 KB = .163 MB was used by leaving my phone on (by “on”, I mean restrictions set to normal and turning the phone on to see if my Usage level had changed) for an hour.

2. If I turn off Cellular Data and Data Roaming, do I also need to turn off 3G?  Nope, if you turn off Cellular Data and Data Roaming, you are good to go with regard to Network Settings (you will still need to disable push notifications)- and yes, you will still be able to send and receive text messages and calls…oddly enough. (See this article)

3. I went to Mexico a couple of months ago and turned off all my Roaming settings, but was still wondering about calling and texting plans for International travel.  I spoke with a very nice woman and asked her all sorts of questions…..and found out the following bits of info that I thought were interesting.

TEXTING PLANS – Texting plans are pro-rated because they are a monthly charge. She mentioned this to me because I wanted to get the “50 msg for $10 plan” and she asked me how long I would be staying in Mexico. I said “a week” and she said I could sign up for the “200 msg for $30 plan”, use all 200 messages, and as long as I called them when I got home to cancel the plan for the remainder of the month….the charge would only be about $7.50 because I had only used a quarter of the allotted time on the plan…..of course there is no mention of this on the website and I would call to make sure they have not changed the rules by the time you read this……

CALLING PLANS – I asked her “if someone calls me and I don’t pick up, I don’t get charged – right?”   WRONG! You are charged from  the  moment  your  phone  starts  ringing.  I asked her if there was any way to block calls but still have my phone on so that I could make calls and just not receive them…..Nope…..except that I could forward my calls to a different number (home, different cell, etc.) so they would never ring through to my phone — Excellent idea!!  – just be sure to make sure the message asks the caller to text you…without sounding like you are out of town – in the event of an emergency, people can text you and ask you to call them!

Call Forwarding

Here is a link to the About.com Iphone Data Roaming Horror Stories Forum

$7,000 lesson!!!

I just got back from Europe and found out the the few hours I used the Internet cost me over $7,000.00! Even though I called my cell phone company and purchased a roaming package, I learned that I only had very limited coverage (10mb). I was shocked – I did not know this could happen! This was a very expensive lesson and I will turn roaming off from now on – no more data plans for me!
—Guest DB
And last but not least a couple of useful links for conserving data usage on the iPhone
www.imore.com  Data Conservation
www.apple.com
By Eleanore Macnish

Design a Cocktail Party Invitation to text to your friends!!! Impromtu “Pop Up” Cocktail Parties are such fun!

Sometimes, ideas just Spring themselves on you (sorry, I couldn’t resist)!  Like this morning I was cleaning out my studio and came across this wonderful issue of Anthology Magazine.  Looking for a reason to take a break after cleaning for a whole 20 minutes, I sat down to thumb through the pages and realized I had already read this issue…….but also remembered that there was an awesome cocktail party photo spread!  Then I thought…”hey!  I should have a cocktail party today!!!….or maybe tomorrow!!!”  But what’s a girl to do when there is only 24 hours until said cocktail party arrives and no time to send out invitations…..or even Evites?…….and then it occurred to me…..what about a text invitation?…….but those kind of things can be soooo boring!  Not to worry!  With the help of the camera on my phone (iPhone) and an awesome app called Photogene, I designed an invitation to text to my friends to alert them of soon to be flowing libations — wahooo!

…….and then I remembered I have a party to go to tomorrow night…….and I would have to clean up the patio…….hmmmm maybe another Friday evening in the near future.  At least I got the invitation done before I remembered I couldn’t have the party!

Here is how to do it!  By the way, I think this is legal because it is not for publication and is for personal use but you might check it out if you worry about such things.

(Click on photos to enlarge them)

1. Find something with fabulous photos

2. & 3. Take photo of fabulous photos……take a close up shot.

4. Get this amazing app called Photogene from the app store.

5. Open Photogene app and choose “edit new photo”, pick your photo from “Camera Roll” and wait for it to load.

6. Click on scissors icon in upper left corner of app and drag the green dots to where you want to crop your picture.

7. Click on Star icon and swipe left on bottom bar to choose the rectangle shape.  Tap, hold and drag the rectangle shape onto your photo.

8. Double tap on the rectangle and wait for the keyboard to appear.  Type in your text.

9. Click outline and pick the top left corner gray button to choose no outline.

10. Click on Font and choose your font.

11. Click on Fill and choose the upper right corner gray.

12. Click anywhere on the image to get rid of all the options. Click the lower left corner “check mark”.

13. Click “save”

14. Do all of the above steps for your next photo.

Now, press your “Home button” on the bottom of your phone screen, go to your photos and text them to your friends for a “Pop Up Cocktail Party”!

Wahooooooo!  Cheers!